Four bottles without wine taught a room of experienced tasters to finally agree
A little more than ten years ago, in Hong Kong, I started hosting a weekly practice tasting for students preparing for the WSET Diploma. Twenty to twenty-five people came each week.
They were experienced tasters, and that made the problem harder. Reaching a consensus on the level of each component was difficult, unless I imposed one, and I had no wish to rule the room by decree. One person found the acidity high, the next found it medium. A tannin that felt firm on one side of the room felt supple on the other. Sweetness divided us most of all. The discussions went round in circles, each opinion as confident as the last.
So one week I brought four bottles with no wine in them.
Each held filtered water and a single addition. Malic acid at 5 g/L. Oenological tannin at 2 g/L. Alcohol at 15%. Sugar at 45 g/L.
We tasted them one by one.
The acid made the mouth water at once, saliva rising along the sides of the tongue. The tannin dried the gums and roughened the inside of the cheeks. Both felt hard. The alcohol was the surprise. It turned the water thick, almost oily, and left a slow warmth at the back of the throat. That warmth, I told them, is the most reliable guide to how much alcohol a wine contains. The sugar coated the tongue. Alcohol and sugar both felt soft.
Many in the room still relied on the old map of the tongue, sweet at the tip, sour at the sides. It was disproved long ago, but it lingers. Now each of them could feel where these sensations actually landed in their own mouth.
Then we began to mix. Acid and tannin together became harsh, each making the other harder. I added the alcohol, and the mixture softened. The French call this quality moelleux, soft, the way a pillow is soft. English wine writing often translates the word as sweet, because French labels also use it for medium-sweet wines. When applied to alcohol, the word describes a texture. Last came the sugar, and the solution settled. For the first time, it felt balanced.
It was a revelation for everyone in the room.
I have opened every course I teach with that session ever since, from Level 1 to Level 3. The discussions that follow are different. They are focused and objective, and full of insight, because everyone is finally describing the same thing.
Doing it yourself
What happened in that room in Hong Kong can be repeated in any kitchen. The method below follows the sequence I use in class, in four steps of about twenty minutes each, which can run on separate days. You need a kitchen scale accurate to 0.01 g, a set of identical glasses, a few ingredients from a home-winemaking supplier, and a friend willing to pour. The recipes are at the end.
Step one: recognise each component alone
Start with the four solutions I used in Hong Kong: malic acid, tannin, alcohol and sugar, each in filtered water. The doses are deliberately generous. At this stage you are learning what each component is, so it should be unmistakable.
Technique matters more than most people expect. Take a small sip, hold it, move it over every surface of the mouth, then spit and wait. Much of what you are looking for arrives after the liquid has gone.
Acid and tannin announce themselves through physical reactions you can locate. Acid makes the salivary glands work, and the saliva rises from the sides and floor of the mouth. Italian tasting schools grade freshness by exactly this, from a moderate flow of saliva to an abundant one. Tannin does the opposite. It binds to the proteins in saliva that lubricate the mouth, which is why the gums and cheeks feel stripped and rough.
Alcohol needs a technique of its own. Take no more than a teaspoon of the solution and keep it on the palate. Purse your lips and draw air in through them, as if pulling on a straw. The air carries the vapour to the back of the throat, and that is where you feel the heat. Practise this with wines of known strength and the heat becomes a gauge: 12% and 15% feel very different. Notice also how alcohol thickens the water. That viscosity is part of what we call body.
Then sort the four into two families. Acid and tannin feel hard. Alcohol and sugar feel soft. Italian tasting schools call them durezze and morbidezze, and every judgement of balance weighs one family against the other. Then mix them, the way I do in class. Pour about 150 ml of each solution into its own glass. After tasting each one alone, tip what is left of the tannin into the acid glass and taste. Add what remains of the alcohol, then the sugar. Each pour dilutes the rest a little, so treat this as a demonstration rather than a measurement. The contrast is still unmistakable: hard on hard, then a softening, then balance.
Bitterness is left out deliberately. Sensitivity to it varies so much between individuals that I don't treat it as a reliable measurement. Learn only to keep it apart from the dryness of tannin.
Step two: measure intensity
Recognising a component tells you what it is. It tells you nothing about how much. For that, professional panels use ladders: the same component at four rising strengths, to be put in order.
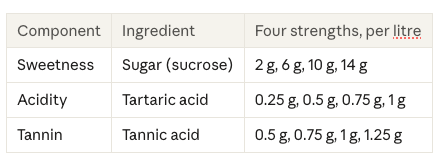
The ladders recommended by the OIV, the international body for vine and wine, are far finer than my teaching solutions. Sugar runs from 2 to 14 g/L, tartaric acid from 0.25 to 1 g/L. The lowest steps sit close to what most people can detect at all. Candidates for a tasting panel are expected to rank most or all of them correctly.
Taste each ladder from weakest to strongest first, so you feel the steps. Then ask your friend to code and shuffle the glasses, and rank them again. Where you go wrong, taste the two glasses you confused side by side, and come back another day to repeat it.
The point is to give low, medium and high a physical sensation you can return to. Without one, every wine is judged against its neighbour. A Chianti Classico poured after a Barolo seems light in tannin; poured first, it seems firm. A fixed reference stops the scale from drifting with the flight.
Step three: read the components in wine
In wine, everything arrives at once and the components hide one another. The exercises here use a single base wine, changed one element at a time and poured into coded glasses. Because the base never changes, whatever difference you find comes from the addition.
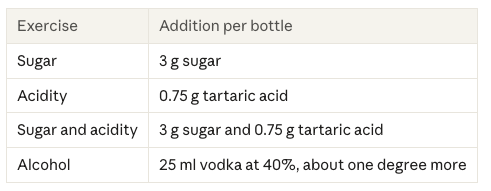
Sugar and acidity. Pour four glasses of a neutral dry white: as it is, with added sugar, with added tartaric acid, and with both. Score sweetness and acidity separately in each glass. In my classes, many people lose the sugar in the fourth glass. When researchers at the University of Sarajevo added sugar to eleven dry whites, experienced tasters first recognised it at between 3.8 and 6.1 g/L, and the more acidic the wine, the more sugar it took. This is why an off-dry Mosel Kabinett tastes drier than its analysis suggests.
Alcohol and body. Pour the base wine beside the same wine with a little neutral spirit added, about one degree more. Use the straw technique on both and compare the heat. Then judge the thickness as the wine moves, and the fullness overall. An Australian study raised the alcohol of three Rieslings from 11.6% to 13.6%. Every wine felt hotter, and two of the three gained body and viscosity. Alcohol softens a wine and fills it out. Learning to feel that softness separately from its heat is one of the most useful skills a taster can build.
Tannin texture. A single tannin solution shows you only one kind of dryness. In wine it can be fine as powder, chalky, grainy, coarse or green, and each texture offers clues to the grape, its ripeness and its age. A team of Italian researchers described these textures in wines from eleven native grapes, Nebbiolo, Sangiovese and Aglianico among them, and found they were distinct enough to tell the varieties apart. Learn them by comparison. Taste a young and a mature vintage of the same wine together, then three varieties side by side. Each time, write down how much tannin, and what it feels like.
Serve every wine in a comparison at the same measured temperature. Cooling a wine sharpens its acidity and hardens its tannin, and a few degrees can shift your judgement.
Step four: hold the scale
Calibration gives you a scale. Consistency means holding it from one day to the next, and it has to be tested separately.
Professional panels do this by stealth. The OIV suggests hiding three identical samples in a series of at least six and checking whether each taster scores them alike. At home, a simpler version works well. Ask your friend to pour four wines into five coded glasses, one of them twice. Score each component, then compare your two scores for the twin. The gaps are precise, and a little humbling. Your acidity may hold steady while your tannin wanders by a full step. That is where to train next.
In my own teaching I use the same wines across several courses, so each reference tasting note is tested against a large number of students before I rely on it. On a smaller scale, keep a few bottles you know well and return to them.
A few conditions keep the results honest. The Australian Wine Research Institute recommends no more than six or seven wines before a short rest. Leave a minute between tannic wines, because astringency builds in the mouth across a flight. Write your scores before anyone speaks; once a room has an opinion, memory bends towards it.
Finally, allow for your own physiology. Researchers in Florence found that people who produce less saliva perceive astringency more intensely. If you consistently find tannins grippier than those around you, it may simply be your saliva. Calibration is how you learn that tendency, and allow for it.
What a shared reference gives you
Since that evening in Hong Kong, I have watched the same thing happen in every room. Once people share a reference, the arguments change. Nobody has to defer to the most confident voice at the table. They can point to the glass and say where they feel a component, and how strongly.
The same is true when you taste alone. A calibrated palate can explain its own pleasure: the acidity that carries a Verdicchio, the tannin a young Barolo has yet to resolve, the warmth that makes a wine feel heavier than its fruit. Once you can name what is happening in your mouth, you can go looking for more of what you love.
It begins with four bottles that have no wine in them.
Practical sheet
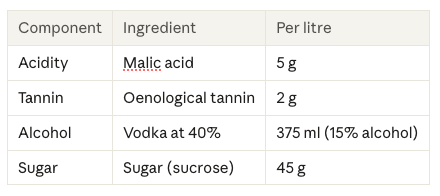
Step one: the four recognition solutions. These are the solutions I use in class, each made up to one litre with filtered water. Pour about 150 ml of each into four different glasses.
Step two: intensity ladders. Four strengths per component, each made up to one litre (for tannin the OIV uses tannic acid; here it is the same oenological tannin as in step one), following the OIV's guidance for training tasting panels.
Step three: additions to wine. Starting points per 750 ml bottle of a neutral dry white; widen them if the difference is not yet clear. Dissolve each addition in a little of the wine first, then return it to the bottle.
For every session
Food-grade ingredients, a scale accurate to 0.01 g, identical glasses.
The same measured temperature for every glass in a comparison.
Have someone else code the glasses, and write scores before the reveal.
Six or seven glasses at most, then a rest.
Sources
Practical sensory evaluation considerations, Australian Wine Research Institute
Enology Notes 158, Virginia Tech
Ethanol, glycerol and the body of Riesling wines, Gawel, Van Sluyter and Waters
Astringency of single-cultivar Italian red wines, Piombino et al.
Sugar, acid and the sweetness threshold of white wines, University of Sarajevo
Saliva and perceived astringency, Università di Firenze
Tannins, astringence et amertume, Université de Bordeaux
Scheda di degustazione, Università di Trieste
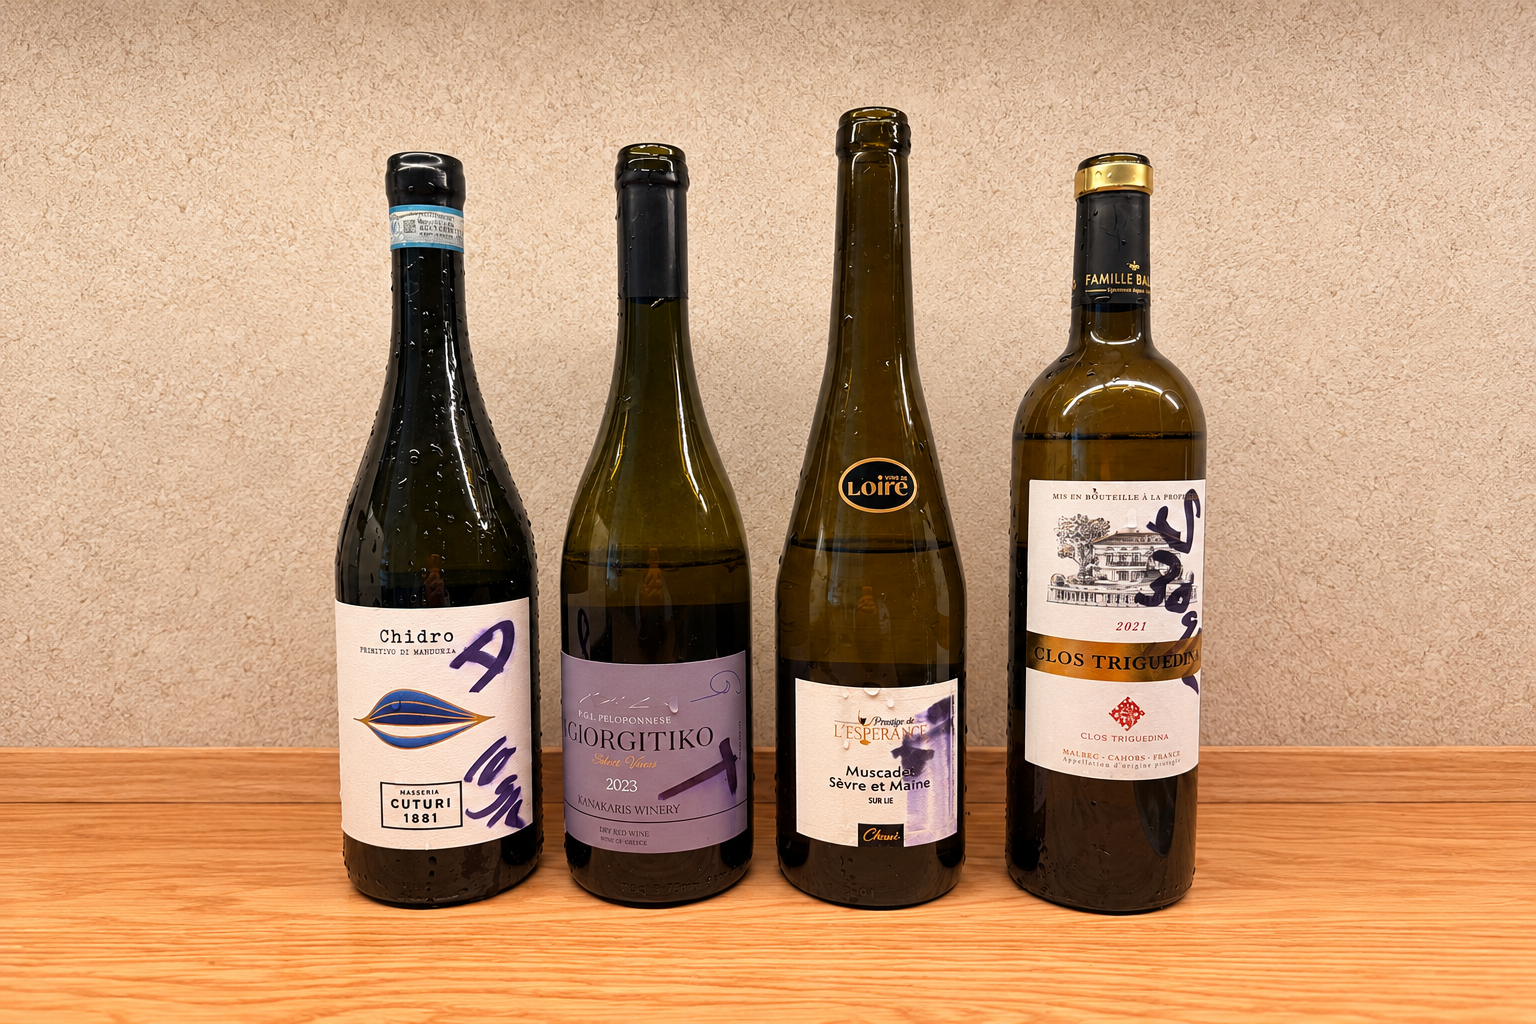
Photo by JC Viens